30 January 2014

VALENTINE'S KIDS CRAFT - TRIANGLE HEARTS

Looking for a fun craft to do with your kiddies? This is super easy and cute. Here's a quickie tutorial for a TRIANGLE HEART GARLAND.

SUPPLIES
Valentine's colored pipe cleaners - Michael's

PROCESS
1. Bend one pipe cleaner twice (in 1/3 spots) making a triangle.
2. Kink the top ends, wrap them around each other and pinch together to close the triangle.
3. Push in the side on the opposite side of the closed point to make a angular heart shape.
4. Take another pipe cleaner, send one end through the first heart and repeat the process.
5. Do the whole bunch and you've got a nice garland of triangle hearts.


23 January 2014

FELT HEART GARLAND

I get together with a bunch of friends every so often for DIY NIGHT. With Valentine's coming up we've crammed in two this month. Last time I started hand stitching these little felt hearts and made a garland with them. Tonight is another DIY NIGHT... what should I make?


21 January 2014

VALENTINE'S FELT ENVELOPES

Last year I saw these felt envelopes at Pottery Barn Kids so of course I knocked it off my own way.

The night before my husband and I had our own little craft night making cards for our girls. They enjoyed it so much that I feel like we need make this a long running tradition. Then when they're grown they can see an accumulation of love notes from their mom and dad.

These are aprox. 9" x 7" white felt envelopes with pink puffy heart closures. Lined with pink printed cotton fabrics. I also used gold thread. These were quickly done, and a bit sloppy but they're cute and good for the job at hand.


17 January 2014

BEST BURP CLOTH EVER


I was asked to sew up some burp cloths for the new moms in the neighborhood. Recalling those spit-up days...I wanted an absorbent fabric, sweet pattern and a contoured shape.

Many of the DIY burp cloths you see online are cute and all but the grossness slides right down cotton quilting prints. So when you sew a the patterned fabric to the rectangle cloth diapers (the absorbent part), nothing soaks in. And those ultra soft fabrics like dimple dots don't actually absorb as much as you'd think. Terry cloth is absorbent but it's thick and messy to sew on because it sheds, plus it's not as soft. I even did an absorbancy test on Kokka fabrics because there are so many sweet prints, but alas, not absorbent enough. So I settled on flannel.

Cute flannels are harder to come by than cotton quilting prints. I'm not talking about cutesie baby fabrics. That's what I find at Joann's (No surprise there. Somebody tell me who that buyer is so I can T.P. her house)

Online was my source. I found some designer flannels here and here, the fanfare collection. If you really want to spend a pretty cent on your burp cloths, you can hunt down the amazing Heather Ross Munki Munki flannels (Cut up PJs). That's what I really wanted to do, but I was also on a budget and needed a large quantity.


FREE printable pattern:


SUPPLIES
Flannel Fabric
Sewing Machine
White Thread
Scissors
Straight Pins
Needle
Iron and Iron Board
Chopstick*

PROCESS
1. Print pattern on 11x17 paper and cut it out.
2. Back up two prints of fabric and fold. Line it up so that you can fit as many as possible on the fold.
3. Place pattern on one of the back sides with the "Place on Fold" on the fold of the fabric, pin and cut out.
4. Sew 1/4" in from the edge, straight stitch all the way around the shape, leaving a 2" opening on one of the middle contour sides.
5. Turn inside out and iron flat, making sure to push out all of the fabric. *I use a chopstick to get the full shape.
6. Hand stitch the opening closed using a blind stitch (pretty good tutorial here).
7. Finish off with a decorative or zigzag top stitch all the way around the burp cloth shape about 1/4" in from the edge.


15 January 2014

PLAYROOM IS DONE...ish


This room has taken four years to find it's place. As my daughters room it was never really complete. Now it's The Happy Place. See the style sheet here. There are still a few things to add, but that will happen later on.

For the first time, I can really say I'm pleased with this room. Many thanks to my helpful and patient husband!

WHAT'S IN THERE:
White Expedit Shelves - IKEA
Egg Chair - IKEA
Play Kitchen - IKEA
Knappa Light - IKEA
White Shag Rug - Target
Play Table/Chairs - P'kolino
White Baskets - Pottery Barn Kids
Cloud Shelf - RoomMates
Curtains - IKEA
Side Table - Vintage
Rag Rug - Handmade (more on the rug here)
Yellow Side Table - Vintage (painted)
Green Baskets - Target
Mirror - Handmade
Balloons - Handmade
Jonathan Adler Table Lamp - JCPenney
Globes - Vintage
Fisher Price Toys - Vintage
Mr. TTT - Friends With You
TJUSIG Wall Hooks - IKEA

TO ADD:
Wire Shelf - Urban Outfitters*
New Kitchen Dishes/Food*
Friends With You Map*
Play Table/Chairs - Little Nest
Yellow Pouf - Etsy
Round Rug

*I have these things but I'm spreading the project out. Spoiled kids ;)


13 January 2014

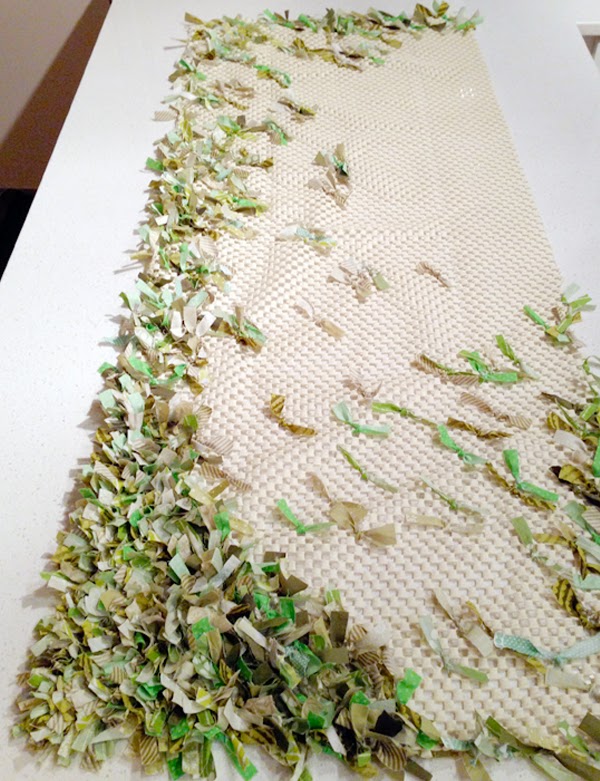
THE GRASS RAG RUG

This was a project that in my mind seemed so simple and then I started in... "what have I done!?!"


Sometimes I think everything is like working on the computer, command Z this and command C, command V that.... making projects so simple when the reality is really a monotonous time taker. THIS was a monotonous time taker.

I did about half of it, I don't even know if you could call it half. It was probably about 18 nights of tying knots, with hand cramps and back aches. It was still so thin and bare looking. Then my husband's grandmother, BLESS HER, was needing some projects and she saved my bacon.

GrandmaGreat completed enough in one week to hit the goal: just enough to make it look like grass. It's not completely full. If you were to turn it over, you'd see lots of spaces that could use filling. She and I both agreed that this is something you could do forever and never be done. But we were both satisfied that it looked like grass and that is all we needed. It is for the playroom and it won't have any foot traffic, it's just for show.

If you'd like to make one, I suggest something small for your sanity sake, unless you too have a GrandmaGreat that is willing to save your hide.

SUPPLIES
Variety of Green Fabrics (I used fat quarters*)
Scissors
Non-Slip Rug (cut to the desired size)

PROCESS
1. Lay out one fat quarter of fabric, one piece at a time, upside down. Fold it in half, and then fold it in half again.
2. Cut the folds so that you have four equal strips.
3. Cut 1/2" strips.
4. Repeat this process for each of your green fat quarter fabrics.
* If you buy more than fat quarters, just do this and eyeball it. The finished strips are about 1/2" x 5".
5. Cut your Non-Slip Rug Pad to the desired size.
6. Begin tying knots*, one strip per opening.
*Because my rug was not in a high traffic area and I'm not planning on ever washing it, I just tied it ONCE, I didn't tie it twice to make a knot.
7. Try to tie all of them in the same direction. I'm not sure why, maybe this is a bit of OCD talking, but it's nice to turn it over and have them all going the same direction ;)

This is what mine looked like after a few nights of working. In my next post... The playroom dress up area has the finished rag rug.


06 January 2014

JANUARY = DEJUNK MONTH

Setting New Years Resolutions are not really my thing. I like the idea of setting goals and New Years Resolutions. I'm all for ideas that better ourselves, our habits and our homes. I just don't like the cliche that we don't keep our resolutions. It all seems so doomed to fail. And honestly, I'm one of the many that has tried the "work out resolution"... and like many others, I made it to about February or March. It's a dreaded task for me, which means it won't easily become a habit.

I need a goal that is attainable to turn this doomed concept around. Sure it can still be dreaded but to make it doable, I make the entire month of January a deJunking month. It is liberating to let go of all the little unnecessary things that get collected all year long.

TAKE CARE OF THE HARDEST PART FIRST
I used to enjoy putting away Christmas because it was easy. I had ONE bin. But now, I have collected quite a lot of decorations, I'm up to six bins for Christmas (that's probably less than most people, I realize). Like most, I have bins for other holidays too, Thanksgiving, Halloween, Easter, Summer/Spring... I also have bins from past parties so I can reuse decorations I've made.

As I pull out decor throughout the year, some gets put away in it's proper place and some doesn't. Some is out on loan and gets put away in the wrong place because I can't even reach the bin that it's supposed to go in. So before Christmas, the storage room is a fright.

As a result, putting away Christmas decorations means it's best to organize the basement storage room first... The aspect of this goal that is a bit of a chore BUT I love the way it feels after it's done!

Color code bins by holiday and/or season:
(I use Target's Sterilite bins because they sell different colored lids throughout the year):
Aqua - Easter
Blue - Spring
Pink - Valentine's Day
Green - Summer
Silver - Various Parties
Orange - Halloween
Bronze - Thanksgiving
Red - Christmas


NEXT ATTACK THE BUSIEST ROOM
After Christmas has come down and the storage room is in order, I move on to the next biggie; the play room. I let the kids in on this one. They "get to" pull out 10 toys that they no longer need. I try to talk up the "get to" because it's hard for them to let go of toys. They've never been the kids that give up their favorite for the child in need. They're not there yet. I have high hopes that they'll be compassionate one day ;)

We put the box in the middle of the play room and load it up. I then load it up when they're not looking with other things that I feel can go. Every mom on the planet loves to get rid of some toys. You know the ones from Wendy's, McDonald's, puzzles without all the pieces, toys that are too young for them.

I keep one bin with baby toys that are sentimental to us. That way if any friends come over that have a baby brother or sister, I still have toys for them to play with.

I TRY like the dickens to edit out the stuffed animals. I'm not sure why this one is so hard for us. I even get attached to some of these toys. If we can pull out 3 plushies each we're doing great!

USE THE ENTIRE MONTH FOR ALL THE OTHER ROOMS
Next I go after our closets. My husband and I edit out our closets easily, we know what we don't wear enough to justify taking up space. He's a shoe guy so it's always great to lose a few of those. Big feet = big shoes = space takers.

Then I edit out the kids clothes. I have the clothes in bins by size. Clothes that my youngest can wear are most accessible and the small sizes that both my girls have grown out of are put away for the long haul. In those bins, I only keep the extra special, sentimental outfits, the clothes that they may want for their own kids later.

Next, I edit out the bathroom cupboards and drawers, the medicine cabinet, the food storage, and kitchen cabinets.

By the time January is over we all feel refreshed. It's amazing what editing for a month can do to the way your home feels!


19 December 2013

CHRISTMAS NEIGHBOR GIFT - HOT CHOCOLATE DIPPERS

It's not too late! Tis' the season for sharing a little something sweet.


This year I teamed up with my good friend Chris from Well & Good to make Hot Chocolate Dippers. I saw them at Anthropologie for $6.00 each and I figured I could make those!

Below are links to what we used. It's not necessary to get a caramel loaf, but it's easier than unwrapping a bag of individually wrapped caramels. I used about 1/4 of the loaf for 60 dippers. I melted the rest of the caramel for another recipe and some caramel apples. So it has plenty of uses. Also, Chris and I did three batches of dippers (two batches were salted caramel, one batch was peppermint = 180 dippers total!), so we went through about a 1/2 loaf by the end of this project.

A word on chocolate. I'm not a master baker, but every time I've bought the chocolate listed below, all has gone very well. I love it. It's smooth and so so yummy.

About the trays. We searched and searched for trays that looked like the same size as the dippers I saw in the store. I liked these because they weren't tapered but completely square. About 1.25"x1.25". After trying out the dippers, this size works great with a small mug of milk. If you have larger ice cube trays, expect to use more milk, or have extremely rich hot chocolate. Also, I've only tried this with silicone. It's tricky to get the first one out, but once that's out, they'll all come out easily. An old hard plastic tray???? Who even knows.

SUPPLIES
Silicone Ice Cube Trays
Wood Coffee Sirrers
Wax Paper
Rubber Scraper
Squeeze Bottle
Pam

Packaging:
Clear Cello Bags - Singles (2.5"x6") Duos (3.5"x2"x7.5")
Ribbon
Tags - See below for FREE PRINTABLES
*Optional - Plates ($1 section at Target) and doilies

RECIPE
Ingredients:
Makes 60 Chocolate Dippers (using four trays of 15 each)
5lb bag of Guittard Milk Chocolate A'Peels
Caramel Loaf
Sea Salt
Hershey's Unsweetened Cocoa Powder

*Optional (and extremely tasty) - Peppermint flavoring oil
Peppermint Candy Canes - Mini's, thick... they all work.

PROCESS
1. Wash each silicone tray and lightly spray with Pam. LIGHTLY.
2. Cut 1/4 of the caramel loaf off and place it on a sheet of wax paper. Slice it into .75" thick pieces. Then cube it into about .75"x.75", you can round them to a ball or keep them flat.
3. Put sticks into 15 of the caramels (enough to load one tray at a time)
4. In a large pot melt about 1/4 of your 5lb bag of chocolate on low. I start at 3-low for a few minutes before I add them, then move the dial between 3 and 2. Stir occasionally. Once melted, pour the chocolate into a squeeze bottle. This will save on the mess!
5. Pour in another 1/4 of the chocolate and stir until the new bits are coated with whatever is left in the pot.
6. Squeeze a bit of chocolate into each spot of ONE tray.
7. Place the caramels with sticks in them into each spot in the tray
8. Check on the chocolate occasionally, stir. You don't want any crumbling or bubbling = too hot. It should be smooth. It's a steady slow heat.
9. Start to add chocolate and fill each of the spots in the tray. You'll probably run out of chocolate in your squeeze bottle, but that's ok, the chocolate in the pot should be melted by now. Reload your squeeze bottle and finish the TRAY 1.
10. Repeat this process for the other two trays.
11. After each tray is completely filled put them into the refrigerator. It's ok to keep them in overnight, but I've found that about 2 hours in the fridge is perfect.
12. After about 20 minutes, you can add some sea salt to the top. Do a bit on one, see if the salt melts in, if so, wait a few more minutes. You want it to be tacky so the salt sticks, but not so hot that it melts in because the salt is pretty.
13. It's nice to have sticks that stand upright, so check on them occasionally, move them back into place.


* If you want some Peppermint Dippers, no need for the caramel. On your next load of chocolate, add a few drops of Peppermint flavoring oil. The sticks will have a tougher time standing up on their own, you can put a mini candy cane in upside down and let the stick and candy prop each other up, or you can get fatter candy canes and break them down to about 2" pieces. I like the finished rounded edge sticking out the best. You can also add crushed candy cane to the tops after about 15 minutes or so (see #12).

14. Once cooled (I think 2 hours is optimal, but overnight is ok) it's time to take them out of the trays. Let them sit about 5 minutes, put down some wax paper.
15. Turn one tray upside down and work on one corner, trying to push out from the bottom and stretch the sides. Do so gently. As soon as you feel it giving way, turn it back over and push it out from the bottom.
16. With one out, you can get the others easily by pushing from the bottom, slightly twisting, pulling at the edges gently. Get them all out and place them onto the wax paper.
17. Dip each one into a bowl of Cocoa powder and tap off any excess. This is mostly to coverup any odd swirling that may have happened while cooling. It looks nice to have them coated slightly in the powder.
18. If needed, you can top each of the caramel dippers with a bit more salt before putting them in their baggies.


19. Print off and cut the tags. Load the dippers either 1 per singles bag (2.5"x6"), or 2 per duo bag (3.5"x2"x7.5"). With the wider bags, I use the folded card and string through the top with ribbon. The individuals get a bit of ribbon cinched around the bag and then a tag on each one. FREE PRINTABLE TAGS are below.

Merry Christmas Gifting! xoxo


Print these on 8.5"x11" Cardstock (q4 Cards) and fold at the center line then punch a hole.
This will provide How-To instructions without having to print front-to-back.


Print these on 8.5"x11" Cardstock (q12 Cards) and cut out each individually.
These do not have How-To instructions. But offer some various mug options.


Print these 8.5"x11" Cardstock (q4 Cards) and cut at the center vertical line then again at the center horizontal line. Then fold at the center line for each card.
 These are for packaged sets of two, one Salted Caramel and one Peppermint.


15 December 2013

TOOTH FAIRY PILLOW

Apparently my husband's family tooth fairy, is named Janice. I love it. Janice?! Who's idea was that? Because all I can think of is "Three's Company". In keeping with tradition... we needed to prepare for Janice's arrival... And FAST. Our daughter had a wiggler for a few weeks and then all of the sudden she was eating breakfast and it just popped out. Quick and painless! Bless-Ed Be because I wasn't interested in the crying and whining... (oh wait, we got our share of that on her second wiggler, exactly 5 days later.)

Needless to say, I was in tooth fairy mode instantly. I had my eye on this pillow for years, but never really noticed the price until recently. Not within my budget for a 5" pillow. I couldn't find any others in the same range of cuteness or patterns for less so I started in. I had 5 hours to start and finish this little friend.


SUPPLIES
White Knit Sweater - (I found one at a local second hand store, it was huge, without seams and the right color, but not wool. It will do in a pinch but wool would last longer.) - washed
1/4 yd. Thin Cotton Muslin - washed
Stuffing
Pattern (see provided PDF)
Pins
Fabric Scissors
Sewing Machine
White Thread
Embroidery Thread - Pink. Warm Grey

PROCESS
1. Print provided PDF pattern.
2. Wash the knit fabric and cotton muslin
3. Lay out the knit, folded once over so you can cut two pieces at once. Situate your pattern on top and pin. Cut around the fabric at the pattern line.
4. Repeat the process for the cotton muslin.
5. Layer the four pieces... muslin, knit, knit, muslin... and pin.
6. Sew around the tooth leaving a 2" gap on one side.
7. Turn the fabric inside out so that the muslin is on the inside.
8. Stuff the tooth with stuffing.
9. Hand sew the 2" side opening closed with small stitching.
For the Pocket
10. Cut a piece of muslin (using a finished end for the top of the pocket if available) that is 2x as long as the pocket size, fold in half and iron.
11. Cut a piece of the knit (using a pre-finished edge for the top of the pocket if available). Make sure it's about a 1/2" larger all the way around from the muslin size.
12. Sew the top of the muslin (unfolded) to the top of the knit,
13. Wrap the 1/2" portions around the folded muslin and pin.
14. Sew the three sides, leaving the top open, creating a pocket.
15. Hand sew the pocket to the back of the tooth.*
16. Embroider the face to the front of the tooth, making the eyes far apart and the smile long.*

* You can also, sew this pocket to the back, before you layer your pieces (#5)
* You can also embroider the face to the front before you layer your pieces (#5)

It is my preference to do these last two steps after the tooth is stuffed to ensure that the placement works. Sometimes stuffing throws me off and the face ends up too low or in a crack... this is just me.

Here's my happy toothless sweetle with her new friend, "Toothie".


Free patterns!


10 December 2013

THE QUIET BOOK

This was a project from a while back but it can't go unposted. It's seriously one of the larger undertakings known to moms.


I always wanted a quiet book. I never wanted to actually make a quiet book. But come to find out... I had several friends with the same want/notwant so we got together and made a plan. There were 18 of us so we each made a page x20 (two people had a spread = two pages). Then we traded goods after a few months of intense sewing...  Bless you Holly and Nicole for taking on a spread each!


It was up to each of us to put them together... back them up either with bias tape or piping (I opted for piping) and some sort of cover. Some put one ring in the corner and used a single ring to keep them together. Some put three rings on and did the same thing but with 3 rings... I wanted to feel like a BOOK so I bought two cheap 3-ring binders, sliced off the front and back covers and turned those into soft binders. It was one of those "wingin'it on Christmas eve" kinds of situations, but it got done.


With 20 pages, front to back, I had 10 completed pages so I split those into two groups and made two books, one for each of my daughters (5 pages each). Today, I tend to use one book and switch out the pages instead of toting two books here and there.

Some page ideas :
1. Zipper pulls
2. Converse Shoelaces - To learn to tie a bow.
3. Garden - This was mine ;)
4. Face - (Girl) with hair to braid and a few barrettes
5. Face - (Boy) with a few mustaches to Velcro on
6. Fish Bowl - magnet fishing line and felt fish
7. Button Flowers - Interchangeable flowers to different button stems
8. Zipper teepee - I enclosed the bottom flap, added felt grass, and bought mini cowboys
9. Alphabet - This needs a full spread (two pages)
10. Alphabet - Attached with Velcro
11. Felt tree with owl and leaves to Velcro on
12. Road Track and Garage - I bought two Squinkie cars to keep in the garage
13. Rocks - Flip up to see bugs under the rocks
14. Patagonia snap Jacket
15. Numbers Match Up
16. Shapes Match Up
17. Ice Cream Sundae - Build a Sundae
18. Clock
19. Weave
20. Mailbox

03 December 2013

CALLIGRAPHY LOGOTYPE

Every so often I try to be a calligrapher. My father-in-law has the patience and steadiness it takes to really be a master calligrapher. I see what he creates and I hope and pray I can muster up a smidge of his talents.

My good friend Christina is needing a logo type and we thought it might be fun to hand letter something for Good & Well. Stay tuned for more.


P.S. A series of 3"x3" thumbnails from the grand master.


22 November 2013

TWINS BABY ROOM CONCEPT

I've teamed up with a friend to create an sweet little baby room for her soon-to-be-born TWINS! We started with the Enchanted Forest mural from Anthropologie, because she fell in love with it instantly. She's having a boy and a girl so the mural offered a fine mixture of masculine and feminine. A bit of softness, and depth. This is a styleboard, inspired by her room. A combination of vintage and eclectic finds to complement the bold red and soft blues found within the mural and a quilt.


18 November 2013

FRUITLOOP FUN FOR KIDS

Fruitloop neckalces... It's nothing new, but it's also so simple, and will get big smiles from the kids faces. It's a must do every once in a while. I'm all for rotating activities and keeping them interested in something besides TV. Plus, now that it's getting cold outside, it's a good activity to add to the Winter Activity List.

P.S. Sometimes the little color compartments are just too tempting and the necklaces don't ever get made. And that's ok.


15 November 2013

THANKSGIVING FEATHER PLACE SETTINGS

Just in time for the holidays!

Make some pretty place settings for your Thanksgiving table. Or think ahead and create something for a future dinner party. Feathers are always in season and always pretty.

See atly.com for the DIY tutorial and be sure to email me (you'll see the link in the class outline) to get your personalized labels for your guest list.

And Happy Thanksgiving!

06 November 2013

CROSS STITCHED SISTERS


I started this so long ago. And my eyes failing have turned it into a long on-going project. It's a sign of age that I choose to deny. But recently I got some readers and was able to complete this little cross stitch of my girlies for their new bedroom. After I finished, I looked for a cute frame and had to stop myself from spending $32 on "the perfect" frame. Instead I found a little $2 white frame that I painted gold. I feel pretty good about the saved $30!


MATERIALS
Martha Steward Metallic Paint in Golden Pearl #349 276
Sponge Brush
Frame
Wax Paper

PROCESS
1. Spread out a sheet of wax paper to keep your painting surface clean.
2. Paint a thin layer of of metallic paint on the frame. Let dry. This is going to look not-so-great on the first coat, but that's ok, the end result will be fantastic.
3. Repeat coats of paint until you get the desired look on your frame. Mine started white and needed about four coats of paint. I liked that it wasn't perfect looking and just had a hint of shimmer.

31 October 2013

HALLOWEEN CRAFTS FOR KIDS

The cute kind of Halloween crafts, nothing gross or scary going on with this crew. I saw this paper plate craft here and needed to do something for my daughter's kindergarten class. After class, I had some left over so we took advantage and crafted up a bat storm! All it really took was some paper plates and construction paper. I like paper eyes better than googly eyes for some reason. You end up with a cute variety of expressions with paper... just in where the kids choose to place the eyes.


MATERIALS
Paper Plates: Circle Black (Bats), Square Green (Frankenstein), Circle Orange (Pumpkin).
You could also do White (Ghost), Green (Witch)... on and on and on.
Construction Paper: Black (for all three), White (for all three)
Ribbon: Green (for the pumpkin stem)
Scissors
Glue Stick
Tape
Stapler

PROCESS
Frankenstein: Cut black hair the width of the plate, about 3" tall, and zigzag one of the long edges. This is the hair. Cut 2 quarter sized white eyes, and 2 dime sized black eyes, Cut a strip of black about .5" tall for the mouth, length can be as long as you want. Cut 2 bolts that are shaped like chunky "T"s. Glue the hair on first, then the white eyes, then the black, then the mouth strip. Last, tape the bolts to the back. Frank is done.
Bat: Take one full sheet of black construction paper, fold it in half (the short way) and cut both wings at the same time. Draw first, from the bottom right corner, up to the fold (midpoint) and rounded down to the mid point of the left edge of the paper. Then start 2" down (this flat edge is where you tape the wing to the back of the plate) and draw the two concave sections, meeting up at the corner starting point. Cut 2 quarter sized white eyes, and 2 dime sized black eyes. Cut 2 small white triangles for fangs and 2 larger triangles for ears. First tape the bat wings to the back, and secure them a bit with glue. Flip the plate back to the front and glue the white eyes, then the black. Glue the fangs then tape the ears to the back. Bat is done, and his wings can flap a bit which is fun.
Pumpkin: Cut a 3" strip of ribbon and a black mouth any variety of smile or non smile you want. Cut 2 quarter sized white eyes, and 2 dime sized black eyes. Glue the eyes and mouth on and then fold the ribbon in half, tape the end to the back and secure it with a staple. Done. These are cute hung by the stem.

23 October 2013

WHO'S READY FOR THE BBC?

Downton, Season 4 will air January 5th. Sherlock Season 3 starts January 19th. Call the Midwife, Season 3 will be in Spring of 2014. Just a little while more to wait for these fantastic shows, thank goodness for the fillers and repeats. I'm always up for a repeat of these shows, or the opportunity to catch up on those that I haven't seen yet. Right now, I'm really enjoying The Paradise. Better than Mr. Selfridge, in my opinion.

Have you ever watched The Last Enemy, again with Benedict Cumberbatch. it's on HuluPlus. I'm also catching up on Call the Midwife Season 2. There's always something from BBC that keeps me entertained. P.S. wasn't Silk amazing?!?! And there will be a Season 2 (hooray!).


22 October 2013

A PLACE FOR PLAY

A playroom. I never thought it was necessary until toys were splattered about in every room. I realized the reason for all the fuss. A place where everything goes at the end of the day.

Before we moved to this home it was the Master Bedroom, so it's quite a decent size. When we moved in we made it our daughters room (remember the hodgepodge? and the dress up closet?). Now our girls share a room so this room is turning into the happy, sunshiney play place. A place for friends to come and play. P.S. I WILL fit the treadmill in here too. I'm determined.

This is the style sheet I came up with while planning.


From the color palette above, the far right is the closest to the wall color we chose (Valspar, Mino's Eye). My husband painted the room while I was out of town on a girls trip. Oh, how I love him. I married well.

We already own several items, the egg chair, kitchen, and shelving from IKEA, The Pkolino Little One's table and chairs. We have a few vintage globes laying around, oodles of vintage Fisher Price toys and paper mache hot air balloons. We have a cloud book shelf, a Jonathan Adler lamp and a vintage yellow table for the dress-up accessories. We also already have a Mr. TTT Bop Bag and the Wish Come True toys by FriendsWithYou. Mr. TTT is a signature piece in this room. He's always smiling, no matter how much he gets knocked around. I found a wire storage basket from Urban Outfitters to hold all of the kitchen goods. I also bought a white white shag rug for under the kitchen table. I'm making a rag rug (which may kill me) for the dress-up closet. A beautiful letterpressed calendar from Lab Partners still hangs in this room, and I have an adorable These Are Things map that needs to be hung.

For the wish list: A cute tent or teepee with white lights all around and a yellow pouf so big people can sit at the kitchen table with the littles. In the future, if I come across any kind of It's A Small World items, more vintage FP toys, or FriendsWithYou doodads... they will find a happy home in this room.

17 October 2013

CINDERELLA BIRTHDAY PARTY

My little one loves two things: 1) Cinderella and 2) Yellow. So we had a Cinderella party with a few of her friends for lunch and dress-up.

I was really wanting to keep this simple and less expensive because I'm great at spending too much time and money on birthday parties.

I started with yellow and blue... yellow because that's her favorite color and blue for Cinderella's dress. I had some garlands and decorations from past parties. It was fast and easy to make a Happy Birthday banner and incorporate a bit of Mary Blair style. I also used her influence for the invitations. I found some Lucite blue crystals at Michael's for cheap-cheap, bought a slew of balloons, made my usual 36" balloon tassel out of ribbons that I had stashed, BOUGHT the cupcakes this time and made sure they were mini's to cut down on the mess. I was doing good, fast and easy. The lunch was easy too because honestly, three year olds eat like birds.

MENU
Melon Balls
Skewered Cheese and Ham Chunks
PBJ Sandwiches Cut with Crown Cutter
Lemonade

DECORATIONS
Streamer Backdrop
Old frame with cut-out No.3 (glittered)
Lucite Crystals from Michael's
Balloons
Mary Blair Castle (large to hang, tiny for cupcake topper)
Happy Birthday Banner
Puff Ball Garland
Glitter Puff Garland
36" Balloon Tassel of Ribbons
No.3 Photo Wall
Yellow Roses


TABLE SETTING
I had a simple white table cloth, with white paper doilies, yellow plastic plates and vintage crystal cut glass dessert plates. I took those off for lunch but used them for the cupcakes later. I had some plastic forks, napkins, canning jars, lids and straws on hand. The star wands came from Target's party section.

PARTY FAVOR
At each table I filled a blue box with dollar store puzzles and Cinderella goodies. I made little tags for each girl and tied a balloon to each one. So when they left they would get a party favor box, a balloon and a craft.

CRAFT
Prep Ahead:
6" Doilies - Dye these blue before hand by simmering on stove top with some food coloring. Try not to simmer too long, the longer they're in the water, the more fragile they are along the lace edging.
Wood Peg Dolls
Craft Paint (Lt. Blue, Yellow, White) - I used shimmer paint for the blue body and white shoes, regular craft paint for the yellow hair. When painting the hair, I globed it on in the front a bit for bangs.

During Party:
Variety of Markers (Black, Pink, Blue) - Thin is best. Black for necklace in the neck-indent, Pink for lips, Blue for eyes and headband.
Hot Glue Gun and Sticks - I maned the hot glue gun for safety.
Mini Blue Sparkle - I hot glued these even though I bought the sticker sparkles. The sticker didn't stick to the round body.
Blue Doilies & Glue Sticks - Glue the doilie-skirt together. To make it more secure add a touch of hot glue but be careful not to burn yourself. See pattern below for connecting the skirt (at the first circle along the bottom). Use this as a visual guide (no need to print it out): Match up the circular areas where the "x's" are to create a skirt. If the circle doesn't fit around the peg, cut a bit more center circle until it does fit. Once the skirt is glued together and fits around the peg, take it off, then hot glue around the peg at the ;) crotch area and then slide the skirt on to keep it in place.
Yellow Mini Pom Poms - Hot glue to the back of her head for a bun LAST.


P.S. This is the sweetest bunch of princesses ever. They arrived in their favorite princess dresses and played so well together, adding crowns, hats, beads and shoes from the dress-up closet. I adore these little sweeties. They also danced and watched a bit of "Cinderella" before their fancy luncheon.


26 September 2013

PLEASE VOTE!!!

We really need to win this!!! Please click here to vote! I beg of you ;)

We recently painted our living room a deep teal and then the Apartment Therapy Color Contest came around. What timing!

It's an honor to be on this list... it would be even more amazing to make past the first round and it would blow my little mind to win. We are in the "dark" category, so there is some hope.

There are lots of beautiful rooms so check it out, vote for ours, please. And maybe next year you could enter something from your home! It's such fun.


17 September 2013

A FEW GOOD ROOMS

A few of you have wanted to see my sister-in-law's home that I've been working on. Some little bits here and there still need attention but for the most part, much of the home and grounds are complete. I may post more later, but for now, here are the kids rooms and the living room, three of my favorites.

If you remember, I had a series of ideas for baby rooms, here. Some of those ideas came to fruition. For the baby's room, a combination of "In The Garden" and "Woodland Friends", and the kids room, "Vintage Circus".

The living room, I always envisioned the fragility and colors of a basket of farm fresh eggs. With varied whites, creams, tans and greys.

You can see the style boards for these rooms along with several others, here.