She's obsessed. Ariel is all around as is Belle, Cinderella, Aurora and every other princess conceived by Disney. When I asked my oldest, "What do you want to be" and she said Ariel with a huge grin, I decided I'd better make this one because the purchasable costumes are a wee bit too "show-E" for my four year old.
My littlest wanted to be Belle. That one I could buy but I've found that whatever costume I get for my kids, there's at least some altering needed if not embellishing. That's ok, that makes it their own.
First, I drew up a pattern and measured my daughter's waist, hips, and leg length. She wanted a tail instead of just a pouf skirt so I thought if it ended right at the ground, and came up a bit in the front, maybe she could walk rather than waddle.
Next for the top, I bought a bodysuit from American Apparel and sewed on sparkle purple fabric shaped like the shells and then carefully glitter glued an outline as thin a possible. Then I sewed on a gold fish button. For the skirt, I got "Spirit Mermaid Foil" fabric at Joann's (I actually preferred pale green back-side because the color was closer to Ariel's tail). I basically made a simple elastic waistband skirt that has a glitter fabric fin in the back and it comes up in the front. Then I added a bit more glitter fabric on the back-side and a gold starfish button.
I must admit, this isn't a toss-it-in-the-wash costume, but I'll keep it in the dress up closet after Halloween. She loves wearing it and feels quite proud. Next year, she announced, she wants to be a mermaid every year. Just a different color each time. Uhhhm, no.
The shoes came from the Disney Store, but they were last year's and slightly used for $5.00! Sold! I don't think I've ever purchased anything from that store for $5.00.
25 October 2012
10 October 2012
DIY HALLOWEEN GARLAND
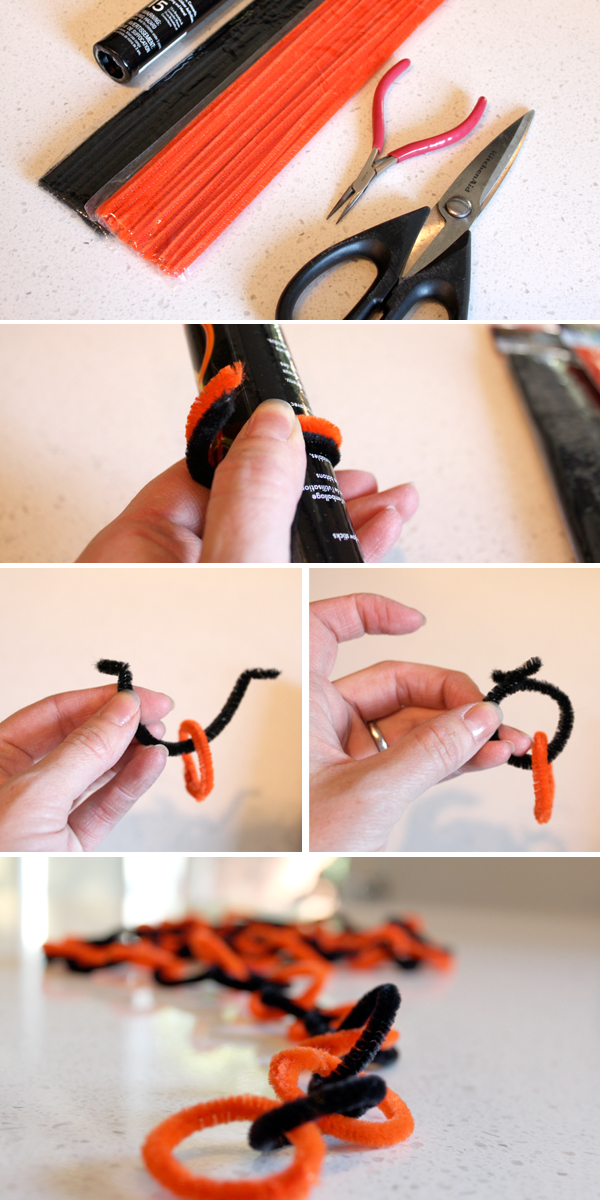
I saw this cute chain in a nearby shop for... too much money... and thought, good grief, that's easy and it was. Takes about two hours to make one chain. So I popped in a movie I've seen about twenty times and started in.
I used less than one package of each and made a 6' chain, a good size for above my daughters door.
NEEDED
Wire Cutters/Needle-nose Pliers
Scissors (that are able to cut through wire)
Orange and Black Pipe Cleaners
Approx. 1" tube
PROCESS
1. Take one orange and one black pipe cleaner, line them up and wrap them together around a 1" tube (your template to keep each ring the same size).
2. Cut the pipe cleaners about 1/4" past the start of the circle. I use my thumb to hold them in place. I can get about three sets of circles per pipe cleaner.
3. I like to cut a bunch of the circles first and have them all ready to link. Use your wire cutters to bend each end about 1/4". I bend the left end back and the right end forward so they can hook together and "catch" each other.
4. Hook the circle by "catching"and bend the tabs down. I use the pliers to smooth down the ends and blend them into the circle a bit so not sharp bits stick out.
5. Repeat by linking the next color, if you started with orange, use black next and keep alternating.
6. Repeat the links about a bajillion times ;) As many as you'd like for your needs.
I used less than one package of each and made a 6' chain, a good size for above my daughters door.
NEEDED
Wire Cutters/Needle-nose Pliers
Scissors (that are able to cut through wire)
Orange and Black Pipe Cleaners
Approx. 1" tube
PROCESS
1. Take one orange and one black pipe cleaner, line them up and wrap them together around a 1" tube (your template to keep each ring the same size).
2. Cut the pipe cleaners about 1/4" past the start of the circle. I use my thumb to hold them in place. I can get about three sets of circles per pipe cleaner.
3. I like to cut a bunch of the circles first and have them all ready to link. Use your wire cutters to bend each end about 1/4". I bend the left end back and the right end forward so they can hook together and "catch" each other.
4. Hook the circle by "catching"and bend the tabs down. I use the pliers to smooth down the ends and blend them into the circle a bit so not sharp bits stick out.
5. Repeat by linking the next color, if you started with orange, use black next and keep alternating.
6. Repeat the links about a bajillion times ;) As many as you'd like for your needs.
06 October 2012
DIY COLORED VASES
This was by far the easiest DIY project I had done in a while. I bought some glass vases at Savers, each only .99 and I have lots of acrylic paints on hand. So for $5.00 and 10 minutes I made several cute vases for a party table centerpiece.
I've seen this around the internets and I think we all agree that the patterned glass and pretty colors are a lovely combination. These can't hold flowers or be cleaned out with water. It's really a nice way to bring in color to a party table.
NEEDED
1. Glass vases
2. Acrylic paint - One color per vase
3. Paper towels - Have a damp one ready to wipe the rim
4. Spoon - To reuse the excess paint that drains out
PROCESS
1. Clean and dry vases. You don't want the inside to be wet so if you clean the inside and you can't wipe it dry inside, air dry it.
2. pour in paint and slowly swirl it around the bottom so that all areas are reached.
3. Slowly tilt the vase down so that some paint starts to drain out (about 2-3" in length)
and slowly rotate so that the paint reaches all around the neck of your vase.
4. Make sure all areas are covered.
5. Place it upside down on a paper towel and let it drain out for a few minutes.
6. Carefully pick it up and wipe the rim with a damp paper towel.
7. Spoon excess paint from the paper towel into the original paint bottle.
8. Let the vase dry overnight.
ONE ISSUE that I noticed a couple of weeks later, the paint started to crack slightly in some areas so I'm going to go back and do another coat, possibly seal it with a varnish. I did a larger vase with spray paint and a spray varnish (several coats of both) and that has held up longer.
I've seen this around the internets and I think we all agree that the patterned glass and pretty colors are a lovely combination. These can't hold flowers or be cleaned out with water. It's really a nice way to bring in color to a party table.
NEEDED
1. Glass vases
2. Acrylic paint - One color per vase
3. Paper towels - Have a damp one ready to wipe the rim
4. Spoon - To reuse the excess paint that drains out
PROCESS
1. Clean and dry vases. You don't want the inside to be wet so if you clean the inside and you can't wipe it dry inside, air dry it.
2. pour in paint and slowly swirl it around the bottom so that all areas are reached.
3. Slowly tilt the vase down so that some paint starts to drain out (about 2-3" in length)
and slowly rotate so that the paint reaches all around the neck of your vase.
4. Make sure all areas are covered.
5. Place it upside down on a paper towel and let it drain out for a few minutes.
6. Carefully pick it up and wipe the rim with a damp paper towel.
7. Spoon excess paint from the paper towel into the original paint bottle.
8. Let the vase dry overnight.
ONE ISSUE that I noticed a couple of weeks later, the paint started to crack slightly in some areas so I'm going to go back and do another coat, possibly seal it with a varnish. I did a larger vase with spray paint and a spray varnish (several coats of both) and that has held up longer.
20 September 2012
EMILY, YOU WILL BE MISSED.
My sister-in-law is moving soon to be with the love of her life. She will be missed indeed. Maybe this will inspire some road trips for our family. Hopefully she and Jeff will visit often. At any rate, until she moves, we celebrate her loveliness.
She's moving South so we thought we'd send her off with a bit of Palm Springs style. She actually posted this a while back on Pinterest, so we knew she would like it. Thank you Sarah for your inspiring gold flamingos. And thank you to our fabulous friends, Nicole, Whitney, Carole, Britta, and Angie for the beautiful food and beverages.
We love you Em. xxo
She's moving South so we thought we'd send her off with a bit of Palm Springs style. She actually posted this a while back on Pinterest, so we knew she would like it. Thank you Sarah for your inspiring gold flamingos. And thank you to our fabulous friends, Nicole, Whitney, Carole, Britta, and Angie for the beautiful food and beverages.
We love you Em. xxo
15 September 2012
ORGANIZING RECIPES
I am fairly organized. I admit this sickness and people that know me, know this about me. But with all my obsessively organized ways, I have yet to find the best way to organize my recipes. For several years I've spent plenty of time and money trying different methods to organize them so that I can find them easily and deal with the many sizes they come in.
PROBLEM: I have
Recipes from emails that I print at 8.5"x11"
Recipes that I find online and print at 8.5"x11"
Recipe cards from Grandma Wright - 3"x5"
Martha Stewart recipe cards - 4"x5"
Williams Sonoma recipe cards - 4"x6"
Magazine recipe clippings - random sizes
SOLUTION:
1) My sister-in-law has her recipes in pretty file folders and an open top wood bin, I like the looks of this but I want to be able to see the recipes easier and faster.
2) I love all the cute 3x5 recipe card boxes on the market but I have too many recipes to write them all out. Plus I will always be printing things at 8.5"x11" to save time.
3) I used to convert everything into an InDesign file and print those so they all looked the same but who has the time for that? That was clearly pre-kids.
4) Binders! I like this idea so I can flip through them and see the categories easily, but I fill the binders up fast and the tend to fall apart and pop open and all of the guts fall out all over the kitchen floor when I'm in the middle of a crazy dinner rush.
Of all of these options, Binders are the most functional for me, so I will try it again and see if I can make Martha Stewart's Staples products work for me. I like that she has protector sheets with four compartments for her recipe cards and blue protector sheets that I use for my favorite recipes. I put those first in each category so I can find them quickly.
But I have some pet-peeves about binders. I don't like the tabs or any protector sheets to stick out beyond the binder. I also don't like the tabs to be hidden and not stick out far enough from the protector sheets. These seem like simple fixes, but most binders, protector sheets and tabs are not sized appropriately to avoid the issue.
So I altered them. I cut a small opening on the outer edge of a protector sheet (the same width of the tab) and inserted the tab sheet into the protector sheet. This way, the tab is the same size as the protector sheet and the tab extends beyond the edge so you can actually SEE your categories. And they don't stick out past the binders edge.
So far, I have two binders loaded with five categories each. I'm not going to overload them. They look nice and they aren't popping open. My only concern is that Martha tends to discontinue products so I may purchase a couple more sets for the future so that I can add to this plan easily and have it all match.
02 September 2012
FRESH FROM THE FARM PARTY
Nina's party was Saturday evening, the ONLY day with rain in the forecast. It had been high 90s for weeks and weeks and of course here we are in the midst of a storm on her party day. What the?!?! So we went about our business and hoped for the best. Because, what else can you do? It's a barbecue and there's no way around it. Food was purchased, decorations were up, people were coming. It was a "Christmas Miracle", (as my husband says) because it didn't rain until after the party. Not only did it rain, it HAILED huge hail balls as everyone was leaving. And then the power went out. It was amazing, the timing of it all.
Many thanks to our neighbors and family that joined us to celebrate our sweet little tweedle Nina who turned TWO!
Here's a sneak peak of our Farmer's Market Birthday party.

Many thanks to our neighbors and family that joined us to celebrate our sweet little tweedle Nina who turned TWO!
Here's a sneak peak of our Farmer's Market Birthday party.
Below are some of the preparations:
Name Garland - I painted the invite and scanned in the art to apply to other letters and alternated the color palette colors with the painting letters to spell HAPPY BIRTHDAY NINA.
I cut out the printed letters and glued them to twine. Then I clipped mini clothes pins to the top of each letter.
Rag Garland - I cut 1/2" strips from three different fabrics and tied them to a strand of twine. Easy. Done.
Lollies - I've never made these before, but it was easy. I found a recipe here, bought molds and sticks. The other ingredients I had in my kitchen. Added a bit of color and flavoring. Next time, I'll add less color, a little goes a long way.
Pennant Garland - I cut triangles from three different patterned papers and three solid papers and sewed them together. When I make these, I like to make stacks of each pattern so I can grab the next one easily and keep my machine running evenly.
Party Favors - I filled some canning jars with candy and tied a strip of fabric around the lid. I also inserted a piece of burlap into the top of the jar.
Table cloth - I purchased a cheap round burlap table cloth and some fringe at 1/2 price (because that gets expensive) and then I sewed the fringe on.
The other decorations were
things stashed in our basement: wood crates, Grandma Wright's painted vases, old farming crate labels that my husband and I have been wanting to use for something. This was the perfect project. A vintage frame that I wasn't using for anything else, and a wood bowl from Australia.
There's a helium shortage apparently so balloons... I thought I'd have to go without our favorite 36" balloon and blow up the small ones and have them hanging upside down. But then I found someone that doesn't seem to know about this shortage... Thank you Harmons!
A huge thank you to my lovely friend Nicole for making Nina's cute little green tunic. She's so talented and whipped that out in a couple of hours, I'm sure. You can see more of her talents here.

28 August 2012
DIP DYE TREND
It's everywhere. Dip dye. I first fell in love with the Casamania Philippe I cafe table and since then, the trend just hasn't faded. Everything from furniture to hair. With eggs, silverware, dishes, mugs, lamps, spoons, clothing, shoes, sheets, shirts, chopsticks, stationary, pillows, scarves and jewelry all in between. Just about anything can be dip dyed, and it seems the long running trend is going to live on for a while. Some of my favorites are here, here, and here.
The one dip dye item that makes me salivate are the Spoons by Ladies & Gentlemen. I wanted to try making it because honestly, I just don't have $38.00 for a spoon.
It's not really dipping though. This process is masking and spraying. Let me preface this by saying these are not dishwasher safe and are best used as serveware instead of daily flatware. But they add a nice touch of color to a party or dinner table. The smaller spoons are perfect for condiments.
NEEDED:
1. Stainless flatware spoons
2. Spray paint in desired colors
3. Matte clear sealant spray
4. Masking tape
PROCESS
Mask off the spoon portion to leave the handle exposed. Spray 2-3 coats of color. Let it dry thoroughly between sprays. Spray 2-3 coats of sealant, again letting it dry all the way. Take off tape. Wash by hand and use.
How easy is that? This was an experiment. Although I haven't had any scratches yet with this method, If I did it again, I'd try a primer first. Just to see. This makes any old odd bunch of silverware look cute. Teaspoons in a variety of colors or even white to go with your favorite teacups. There are lots of uses. This could also freshen up the tired wooden spoons in the kitchen.
The one dip dye item that makes me salivate are the Spoons by Ladies & Gentlemen. I wanted to try making it because honestly, I just don't have $38.00 for a spoon.
It's not really dipping though. This process is masking and spraying. Let me preface this by saying these are not dishwasher safe and are best used as serveware instead of daily flatware. But they add a nice touch of color to a party or dinner table. The smaller spoons are perfect for condiments.
NEEDED:
1. Stainless flatware spoons
2. Spray paint in desired colors
3. Matte clear sealant spray
4. Masking tape
PROCESS
Mask off the spoon portion to leave the handle exposed. Spray 2-3 coats of color. Let it dry thoroughly between sprays. Spray 2-3 coats of sealant, again letting it dry all the way. Take off tape. Wash by hand and use.
How easy is that? This was an experiment. Although I haven't had any scratches yet with this method, If I did it again, I'd try a primer first. Just to see. This makes any old odd bunch of silverware look cute. Teaspoons in a variety of colors or even white to go with your favorite teacups. There are lots of uses. This could also freshen up the tired wooden spoons in the kitchen.
23 August 2012
21 August 2012
PARTY PLAN. NINA TURNS TWO.
I have a few rules about Birthday Parties for our kids:
1. Don't over do it.
2. Family up until age three.
3. Friends starting at age four.
This year, when we found that most of our family will be out of town when our daughter turns two, we decided to break the rules and have a neighborhood friends BBQ. There will be lots of kids, mostly older than Nina but just having them all there will feel like her party.
We got a big ol' swingset (in June) and after months of having it sit in our garage in boxes, we finally hired someone to put it together for us. Money well spent, I say. My husband doesn't have to dread the job and I don't have to lose him for many hours to the massive undertaking that would've possibly put him into a mental institution and/or recuperative physical therapy.
So there will be plenty for the kids to do, we'll have some good food, cuppie-cakes, a few gifts but most importantly, because I can't help myself, I get to plan and decorate in a Farmers Market theme. Something I've wanted to do for quite some time now.
Here are some of my first thoughts and inspirations:
1. Don't over do it.
2. Family up until age three.
3. Friends starting at age four.
This year, when we found that most of our family will be out of town when our daughter turns two, we decided to break the rules and have a neighborhood friends BBQ. There will be lots of kids, mostly older than Nina but just having them all there will feel like her party.
We got a big ol' swingset (in June) and after months of having it sit in our garage in boxes, we finally hired someone to put it together for us. Money well spent, I say. My husband doesn't have to dread the job and I don't have to lose him for many hours to the massive undertaking that would've possibly put him into a mental institution and/or recuperative physical therapy.
So there will be plenty for the kids to do, we'll have some good food, cuppie-cakes, a few gifts but most importantly, because I can't help myself, I get to plan and decorate in a Farmers Market theme. Something I've wanted to do for quite some time now.
Here are some of my first thoughts and inspirations:
03 August 2012
CUTTING THE CORD
We did it. After neglecting my children to accomplish some serious research on the topic, and discussing the options with my husband. After a few charts and countless articles read, I think we're ready to cut the cable and move on to a more advanced way of using our television.
Our TV is used for a select few (very important) programs: Mad Men, Downton Abbey (among other BBC shows), Modern Family and a few kids shows like Peppa Pig, Charlie & Lola, Curious George and Mickey Mouse. We watch the Today Show in the morning for news and weather and after the kids are in bed, I tend to decompress to reruns of Seinfeld or Friends. That's about it. I do enjoy watching movies but my husband and I seldom watch TV together. One or both of us is usually working on other projects.
That said, we're not the kind of people that NEVER watch TV so this is a move that needs to be thought through. Articles I found particularly helpful, here, here, and here and some other tutorials on how to decide what system is best, here were really what got me going. We don't have Wii, XBox or BluRay so some options weren't available to us. We wanted to keep costs down. We do however already own several Apple products so AppleTV made more sense to us.
Through this process, I have found this decision is very personal to each household. It all comes down to what you watch, where, and how often. How important are these shows to you and can they be found elsewhere.
For us, we were spending $160.00 a month for Comcast (Internet, Cable, Phone) but we don't use a land line and the cable was often a source of frustration. So many channels, still nothing to watch. OnDemand is the most pathetic "perk" ever offered. There's nothing there worth watching and if there is, you have to pay extra for it. Our cable was going out a lot too, so there were many calls made to talk through the technical difficulties. It was just a bunch of waste. And it's hard to swallow the big bill each month amid all the frustrations.
Many friends had already switched and after hearing their feedback, and doing the math, we found that we could save $50.00 a month but cutting out cable, getting AppleTV with Netflix and iTunes to supplement.
Here's what we did:
1. Purchase a Digital Antenna = $30.00 (to get basic HD channels)
2. Purchase AppleTV = $100.00 (the source for Netflix, youtube among others)
That's it for the upfront costs
3. Cut cable and phone from our bundle but keep internet = $80.00 /m
4. Sign up for Netflix = $8.00 /m
* Netflix offers a free 1 month trial. You can't see a list of what they offer on their site without signing up. Many of our favorite kids shows aren't on Netflix but they have enough to replace some them. We can also purchase other favorites on iTunes or search youtube for full episodes.
The one downfall to this plan is we no longer have DVR. I think it's something we'll learn to live without. If it's on Netflix, we'll be able to get to it when needed. But for those times when we aren't home and need to record... there's the negative.
Another possible negative is that Apple will upgrade their product as they often do and we'll need to repurchase. We bought our AppleTV from Best Buy and opted for the $15 upgrade charge. It lasts for two years so if something breaks or if they upgrade, we can trade it in for free.
After one week, I feel like we're really doing well with this transition. It's been good for us. Less sitting in front of the TV channel flipping (something I've mastered over the years). More importantly, less TV in general which is something I continually strive for with our kids.
RESEARCH LIST
- On the left we listed the shows we watch.
- The top columns:
How to get our basic channels: Digital Antenna or Basic Cable (through Comcast) - each option offers the same thing but buying a Digital Antenna is a small upfront cost with no monthly charge as opposed to a higher monthly bill.
How would we find our favorite shows: Netflix (had the most for us), Hulu Plus, iTunes (is our best supplement), Amazon Instant Video... there are many others.
How do we connect to these: Again, there are countless other options but AppleTV and TiVo were the ones I narrowed down to.TiVo offers DVR, but costs so much more, we decided to cut the cost and try to adjust our habits.
Our TV is used for a select few (very important) programs: Mad Men, Downton Abbey (among other BBC shows), Modern Family and a few kids shows like Peppa Pig, Charlie & Lola, Curious George and Mickey Mouse. We watch the Today Show in the morning for news and weather and after the kids are in bed, I tend to decompress to reruns of Seinfeld or Friends. That's about it. I do enjoy watching movies but my husband and I seldom watch TV together. One or both of us is usually working on other projects.
That said, we're not the kind of people that NEVER watch TV so this is a move that needs to be thought through. Articles I found particularly helpful, here, here, and here and some other tutorials on how to decide what system is best, here were really what got me going. We don't have Wii, XBox or BluRay so some options weren't available to us. We wanted to keep costs down. We do however already own several Apple products so AppleTV made more sense to us.
Through this process, I have found this decision is very personal to each household. It all comes down to what you watch, where, and how often. How important are these shows to you and can they be found elsewhere.
For us, we were spending $160.00 a month for Comcast (Internet, Cable, Phone) but we don't use a land line and the cable was often a source of frustration. So many channels, still nothing to watch. OnDemand is the most pathetic "perk" ever offered. There's nothing there worth watching and if there is, you have to pay extra for it. Our cable was going out a lot too, so there were many calls made to talk through the technical difficulties. It was just a bunch of waste. And it's hard to swallow the big bill each month amid all the frustrations.
Many friends had already switched and after hearing their feedback, and doing the math, we found that we could save $50.00 a month but cutting out cable, getting AppleTV with Netflix and iTunes to supplement.
Here's what we did:
1. Purchase a Digital Antenna = $30.00 (to get basic HD channels)
2. Purchase AppleTV = $100.00 (the source for Netflix, youtube among others)
That's it for the upfront costs
3. Cut cable and phone from our bundle but keep internet = $80.00 /m
4. Sign up for Netflix = $8.00 /m
* Netflix offers a free 1 month trial. You can't see a list of what they offer on their site without signing up. Many of our favorite kids shows aren't on Netflix but they have enough to replace some them. We can also purchase other favorites on iTunes or search youtube for full episodes.
The one downfall to this plan is we no longer have DVR. I think it's something we'll learn to live without. If it's on Netflix, we'll be able to get to it when needed. But for those times when we aren't home and need to record... there's the negative.
Another possible negative is that Apple will upgrade their product as they often do and we'll need to repurchase. We bought our AppleTV from Best Buy and opted for the $15 upgrade charge. It lasts for two years so if something breaks or if they upgrade, we can trade it in for free.
After one week, I feel like we're really doing well with this transition. It's been good for us. Less sitting in front of the TV channel flipping (something I've mastered over the years). More importantly, less TV in general which is something I continually strive for with our kids.
RESEARCH LIST
- On the left we listed the shows we watch.
- The top columns:
How to get our basic channels: Digital Antenna or Basic Cable (through Comcast) - each option offers the same thing but buying a Digital Antenna is a small upfront cost with no monthly charge as opposed to a higher monthly bill.
How would we find our favorite shows: Netflix (had the most for us), Hulu Plus, iTunes (is our best supplement), Amazon Instant Video... there are many others.
How do we connect to these: Again, there are countless other options but AppleTV and TiVo were the ones I narrowed down to.TiVo offers DVR, but costs so much more, we decided to cut the cost and try to adjust our habits.
PILLOW CASE TUTORIAL
This has been on my to-do list for months and I finally got to it. It only took an hour. And it looks so nice to see in my daughters crib, it helps clean up her sleep area a bit. Why did it take so long to check this off of my list?
SUPPLIES NEEDED
Iron/Board
Sewing Machine
Scissors
Measuring Tape
Cutting Board/Ruler
Pins
Thread to Match
Two Patterned Fabrics
STEPS
1. I started with a small 13"x20" pillow insert. I measured out two pieces of pattern (A) at 14.25"x21.25" and two end pieces of pattern (B) at 14.25"x3.5". I like the manufacturers edging with the designer name, colors etc. and used it as part of one piece (A). If you're using a different sized pillow insert, just allow 1.25" or so on each side for seam allowance and some space to insert the pillow easily.
2. With four pieces cut, I iron 1/4" of one side (B). I pin (B) to (A) patterns facing each other and sew them together. Then I sew the edge of (B) and iron it open. I like to roll over the edge of (B), iron and sew again to give a clean edge. Repeat for the second set of pieces (A) and (B).
3. I also like to give a added security stitch along the outside of pattern (A) the connecting seam where (A) and (B) are sewn and ironed down.
4. With two complete panels, back them up and pin three sides. The two longest, and the short side of pattern (A).
5. Turn inside out and iron flat. I use a chopstick to get the seam to lay flat as I iron. Insert pillow and done.
Cute, cute.
Iron/Board
Sewing Machine
Scissors
Measuring Tape
Cutting Board/Ruler
Pins
Thread to Match
Two Patterned Fabrics
STEPS
1. I started with a small 13"x20" pillow insert. I measured out two pieces of pattern (A) at 14.25"x21.25" and two end pieces of pattern (B) at 14.25"x3.5". I like the manufacturers edging with the designer name, colors etc. and used it as part of one piece (A). If you're using a different sized pillow insert, just allow 1.25" or so on each side for seam allowance and some space to insert the pillow easily.
2. With four pieces cut, I iron 1/4" of one side (B). I pin (B) to (A) patterns facing each other and sew them together. Then I sew the edge of (B) and iron it open. I like to roll over the edge of (B), iron and sew again to give a clean edge. Repeat for the second set of pieces (A) and (B).
3. I also like to give a added security stitch along the outside of pattern (A) the connecting seam where (A) and (B) are sewn and ironed down.
4. With two complete panels, back them up and pin three sides. The two longest, and the short side of pattern (A).
5. Turn inside out and iron flat. I use a chopstick to get the seam to lay flat as I iron. Insert pillow and done.
Cute, cute.
21 July 2012
SHROOMS
Cute little mushroom bitties. I've been wanting to makes some mushrooms for a while. I'm not very good at sculpting but I had seen several that I liked and wanted to mimic for my daughter's forest room as well as my nieces garden room (Influence here, here and here).
I purchased some Pluffy by Sculpey. It's extremely soft clay that doesn't dry out. You sculpt and bake at a low temperature. It's great for kids so this easily turned into a crafternoon with my daughter.
I started with a small ball, then rolled it to a soft point on one end. Then I gave it a nub at the top and a fat stem. I tried creating a mushroom as two pieces (a stem, and a nub), but after some trial and error, I liked this way better. I used a paperclip end to create the under nub lines first and then I put some into the top of the stem. Then I played with it a bit and give the nub some shape. Last, I manipulated the stem to be either something that can stand on it's own, slim, or I put a straight pin in it. The pin helps it stay in place if it's not able to stand on it's own. It can stick into a shelf or something. Below are several experiments. Not perfect by any means, but cute enough to display as is, paint or use in a terrarium.
I purchased some Pluffy by Sculpey. It's extremely soft clay that doesn't dry out. You sculpt and bake at a low temperature. It's great for kids so this easily turned into a crafternoon with my daughter.
I started with a small ball, then rolled it to a soft point on one end. Then I gave it a nub at the top and a fat stem. I tried creating a mushroom as two pieces (a stem, and a nub), but after some trial and error, I liked this way better. I used a paperclip end to create the under nub lines first and then I put some into the top of the stem. Then I played with it a bit and give the nub some shape. Last, I manipulated the stem to be either something that can stand on it's own, slim, or I put a straight pin in it. The pin helps it stay in place if it's not able to stand on it's own. It can stick into a shelf or something. Below are several experiments. Not perfect by any means, but cute enough to display as is, paint or use in a terrarium.
14 July 2012
GIVING THANKS WITH REAL MAIL
Last September I joined the 52 Weeks of Mail Challenge. Since then, I've written to friends I don't get to see anymore, family members who offer up their kindness, and lovely people from my past that I have missed in my life. It has been rewarding and I'm glad I took up the challenge. I like it mostly because there's always a birthday to remember, or someone to say "thank you" to. This has been a great way to ensure that I say what needs to be said.
Plus, I am still attached to actual mail and I truly hope that the United States Postal System can hold on for dear life. I would cry a long while if real mail went away. If there were no more stamps I might need to seek therapy.

I adore stamps. Thanks to my dear friend, Carlyn. She got me hooked on stamps. We went to London and Scotland together several years back and we bonded creatively over keeping records of our travels with bits of found items, stickers, stamps, rubbings and drawings. I still have those sketchbooks.
And the photos that we took. This was back in the days when we took photos with real film and had to wait until our return to spend the whole of our paychecks to find out if we got any good shots. It wasn't convenient, but I long for the romantic-ness of it all. I still have my Holga and I hope to bust that out someday soon, despite the ever popular and easy Instagram.
But, see what happened to film? Oi, please don't let that happen to stamps and mail. I beg of you.
Perhaps it's time to write a letter, say thank you, wish someone Happy Birthday with a real card instead of on Facebook.
And while I'm at it, I need to plug my favorite book these days: "thxthxthx". I lovelovelove this book. Leah Dieterich not only has an amazing idea here, she has a fabulous talent for writing. I adore her sentiments, frustrations and honesty. That's a great gift to send to someone you miss.
Plus, I am still attached to actual mail and I truly hope that the United States Postal System can hold on for dear life. I would cry a long while if real mail went away. If there were no more stamps I might need to seek therapy.

I adore stamps. Thanks to my dear friend, Carlyn. She got me hooked on stamps. We went to London and Scotland together several years back and we bonded creatively over keeping records of our travels with bits of found items, stickers, stamps, rubbings and drawings. I still have those sketchbooks.
And the photos that we took. This was back in the days when we took photos with real film and had to wait until our return to spend the whole of our paychecks to find out if we got any good shots. It wasn't convenient, but I long for the romantic-ness of it all. I still have my Holga and I hope to bust that out someday soon, despite the ever popular and easy Instagram.
But, see what happened to film? Oi, please don't let that happen to stamps and mail. I beg of you.
Perhaps it's time to write a letter, say thank you, wish someone Happy Birthday with a real card instead of on Facebook.
And while I'm at it, I need to plug my favorite book these days: "thxthxthx". I lovelovelove this book. Leah Dieterich not only has an amazing idea here, she has a fabulous talent for writing. I adore her sentiments, frustrations and honesty. That's a great gift to send to someone you miss.
08 July 2012
GIFTING
Oh, how I love gifts. I love to give them, get them, wrap them, unwrap them, plan them, make them and buy them.
There's something heartwarming about giving a gift. It makes me feel good. I like to dig into my stash of ribbons, papers and twine and wrap things up for the big event.
Giving gifts, it's like playing Santa all year long. How can any part of that not make both the giver and receiver not feel extra special? I wish I could do it more, I double wish everyone in the world could do it more. It might ease some of our tense relations.
There's something heartwarming about giving a gift. It makes me feel good. I like to dig into my stash of ribbons, papers and twine and wrap things up for the big event.
Giving gifts, it's like playing Santa all year long. How can any part of that not make both the giver and receiver not feel extra special? I wish I could do it more, I double wish everyone in the world could do it more. It might ease some of our tense relations.
03 July 2012
GOOD BOOK
One thing my husband and I, together firmly believe in is books. We want to have good inspiration and information on hand, so from the time we were engaged we started our library. We have no trouble justifying the purchase of books. If we go a month without buying one or two it's high-time.
Here's one my husband picked up for me. It's loaded with color and pattern inspiration, wonderful history on Orla Kiely and her process in design. Not to mention it's well laid out and printed. It's a GOOD BOOK.
28 June 2012
FROM LOVE LETTERS TO STYLE BOARDS
After years of Graphic Design and mom'n it up, I welcomed the opportunity to try something different when my sister-in-law and her husband asked me to help them with the interior of their new home. At first, I was all, "Are you sure? I don't know what I'm doing. I've never done that." But I am LOVING this experience. They're dream clients, and that helps.
I approached this project much the same way I start any design problem that needs to be solved; with research and of course, style boards. So many friends have wanted to see what their home looks like. Showing a few of the style boards may offers a small taste.
We started with painting, wallpaper and some minor home upgrades in February. Now, in late June, we're wrapping up much of the major furniture, decor and lighting purchases.
There are three levels; four bedrooms, six bathrooms, two offices, two family rooms, a formal living room and piano room, a kitchen, dining, sunroom, game room and music room. There's a lovely pool with a patio, pool house and tea room. It's such a beautiful home with good solid Arts & Crafts bones.
Originally, it started out with a variety of bold, unappealing wall colors (peach, orangish brown, blue, green) There was nothing subtle about the paint choices. We brought it all down to a more even and natural place. Overall I hoped it would feel like an old love letter written in script on weathered, lined paper... something to be read in a quiet place.
I wanted the formal living room to feel like a basket of fresh eggs. The Master Bedroom needed to feel warm and textural. I wanted their kids rooms to be fun, colorful and appreciated by kids and adults. I hoped their family room would feel like the most livable area with a comfortable, industrial mix. Overall, the style needed to combine Victorian romance with Industrial colors and materials offering a quiet marriage of masculine and feminine. They're happy with their home and I actually want to move in.
There were a few blogs (Here, here. and here.) that I found particularly inspiring as we brought it all together incorporating their existing furniture, paintings and decor with the new.
I approached this project much the same way I start any design problem that needs to be solved; with research and of course, style boards. So many friends have wanted to see what their home looks like. Showing a few of the style boards may offers a small taste.
We started with painting, wallpaper and some minor home upgrades in February. Now, in late June, we're wrapping up much of the major furniture, decor and lighting purchases.
There are three levels; four bedrooms, six bathrooms, two offices, two family rooms, a formal living room and piano room, a kitchen, dining, sunroom, game room and music room. There's a lovely pool with a patio, pool house and tea room. It's such a beautiful home with good solid Arts & Crafts bones.
Originally, it started out with a variety of bold, unappealing wall colors (peach, orangish brown, blue, green) There was nothing subtle about the paint choices. We brought it all down to a more even and natural place. Overall I hoped it would feel like an old love letter written in script on weathered, lined paper... something to be read in a quiet place.
I wanted the formal living room to feel like a basket of fresh eggs. The Master Bedroom needed to feel warm and textural. I wanted their kids rooms to be fun, colorful and appreciated by kids and adults. I hoped their family room would feel like the most livable area with a comfortable, industrial mix. Overall, the style needed to combine Victorian romance with Industrial colors and materials offering a quiet marriage of masculine and feminine. They're happy with their home and I actually want to move in.
There were a few blogs (Here, here. and here.) that I found particularly inspiring as we brought it all together incorporating their existing furniture, paintings and decor with the new.
POLKA DOTS ON APARTMENT THERAPY
Thanks Carrie for the write up on our little party for Stella. Funny thing is since then, I've seen so many things that would've been perfect for the polka dot party. But that's the way it goes, when you're looking, it's harder to find, when you're not, it's all over the place!
16 June 2012
DADDY'S DAY
Our girls are pretty lucky, they have an amazing daddy. A hard working, loving and attentive daddy. I'm so grateful for all he does for us. Thank you for being the best daddy to our girls. They adore you and so do I. Love you.
And to my own dad and father-in-law, you too deserve some praise for your love and support over the years. I feel truly blessed to have you in my life and in our girls lives.
A few days back my husband mentioned something about some yummy wasabi almonds. I got several jars and made a little nut pack for each of the dads in my life. Dad's like nuts.
And to my own dad and father-in-law, you too deserve some praise for your love and support over the years. I feel truly blessed to have you in my life and in our girls lives.
A few days back my husband mentioned something about some yummy wasabi almonds. I got several jars and made a little nut pack for each of the dads in my life. Dad's like nuts.
14 June 2012
FOREST CRITTERS
Here's one way to make everyone jealous; Give these adorable little handmade forest animals to the newest baby in the family with a handmade stump house. All the other cousins were looking around like, "Grandma! What about me?!?!"
Nina was just a bitty when Christmas rolled around and Grandma Brown busted out these sweet little guys. They each have their own rattle in them. There was no pattern, that's how grandma rolls. I have been blessed to have a mother and a mother-in-law that both sew like a couple of champs. I can only hope to have a smidge of their skills. Thank you Grandma Brown for this delightful gift. They still get a lot of attention and looks so darling in Nina's room.
09 June 2012
BALLS FOR BABY
That's a fun title. Quite a long while ago I came across a great tutorial on purl bee for beach balls. When I couldn't shake my psycho nesting phase, I made several. Starting with one for my baby girl for Easter that year. It sort of snowballed from there into a ball for all of our sibling's kids, then friends that had babies, then neighbors that had babies. It has gotten to the point of no return. People probably expect, or at least hope for a ball from me when they have a baby. I'm actually ok with it though because it takes very little fabric, it's a homemade gift that can be personalized with the baby's nursery colors, and it really doesn't take too long. Provided I don't have kids at my heels while sewing. So... it actually takes double the time that it should because when do I ever have no kids at my heels while sewing?
P.S. Don't stick a needle (the one you did the hand stitching with) in the completed ball. I did that once, just for a moment and oops, it went in and I couldn't get it back out without opening the ball up. I got it out, but nothing says, "we're not really friends" like a sharp object inside of a baby's toy. Not the best gift.
I use Purl's template for the medium ball and I pretty much do the rest on my own. Their tutorial is great, but after, what... 24 balls, I've come up with my own tricks and short cuts.
1. First of all, after I cut two pieces for each of the four fabrics, I lay the pieces out to determine the best pattern on the ball. If you create a flat flower with them (face up), I make sure that each pattern's twin is directly across from it.
2. Then I flip the one from the right on top of the one on left, and pin on the right side (that's the edge that I sew). This ensures each pair is "right sides together".
3. I don't chain sew, I probably should, but I don't have experience there so I just sew the pinned side corner to corner, 1/8" from the edge. Then iron the seams.
4. I sew each pair and put it back in it's place so I don't mix up the patterns in the end. Then iron the seams.
5. I sew two sets together to create two bowls, making sure that I don't repeat any of the patterns within one bowl. Then iron the seams.
6. Then I put the two bowls right sides together (make sure that the end fabrics aren't repeated). I match up the top corners first and pin about 1/2" to the right, then 1/2" to the left, that will be the opening. Then pin all the way around the bowl.
7. When sewing the bowl, I start at the top right pin and sew all the way around to the top left pin leaving about 1 1/4" opening at the top (I like the opening at the top because the end cap covers my bad hand sewing job ;)
8. After the ball is sewn, turn it inside out, stuff it, and add a jingle bell.
9. This is another place where I have veered from Purl's tutorial. They use solid fabric for the end caps. I find wool felt to be so much easier and I like the look of it. Cut 2" felt circles. I have found that a tomato paste can is a perfect size. I cut carefully inside my sharpie lines.
10. Hand sew the top opening and then the end caps to each end.
Total time it takes to make a ball: 1 hour if there are no kids at your heels. With kids, about 2 hours to all day.
P.S. Don't stick a needle (the one you did the hand stitching with) in the completed ball. I did that once, just for a moment and oops, it went in and I couldn't get it back out without opening the ball up. I got it out, but nothing says, "we're not really friends" like a sharp object inside of a baby's toy. Not the best gift.
I use Purl's template for the medium ball and I pretty much do the rest on my own. Their tutorial is great, but after, what... 24 balls, I've come up with my own tricks and short cuts.
1. First of all, after I cut two pieces for each of the four fabrics, I lay the pieces out to determine the best pattern on the ball. If you create a flat flower with them (face up), I make sure that each pattern's twin is directly across from it.
2. Then I flip the one from the right on top of the one on left, and pin on the right side (that's the edge that I sew). This ensures each pair is "right sides together".
3. I don't chain sew, I probably should, but I don't have experience there so I just sew the pinned side corner to corner, 1/8" from the edge. Then iron the seams.
4. I sew each pair and put it back in it's place so I don't mix up the patterns in the end. Then iron the seams.
5. I sew two sets together to create two bowls, making sure that I don't repeat any of the patterns within one bowl. Then iron the seams.
6. Then I put the two bowls right sides together (make sure that the end fabrics aren't repeated). I match up the top corners first and pin about 1/2" to the right, then 1/2" to the left, that will be the opening. Then pin all the way around the bowl.
7. When sewing the bowl, I start at the top right pin and sew all the way around to the top left pin leaving about 1 1/4" opening at the top (I like the opening at the top because the end cap covers my bad hand sewing job ;)
8. After the ball is sewn, turn it inside out, stuff it, and add a jingle bell.
9. This is another place where I have veered from Purl's tutorial. They use solid fabric for the end caps. I find wool felt to be so much easier and I like the look of it. Cut 2" felt circles. I have found that a tomato paste can is a perfect size. I cut carefully inside my sharpie lines.
10. Hand sew the top opening and then the end caps to each end.
Total time it takes to make a ball: 1 hour if there are no kids at your heels. With kids, about 2 hours to all day.
01 June 2012
FOR MAISIE
I love the 36" balloons. I'm a sucker for their enormity, and roundness. I can't resist purchasing them for my daughters birthdays and making tassels inspired by Geronimo. I love to see my girls eyes pop out and their mouths drop. It's probably equivalent to us standing next to a Macy's Thanksgiving Day Balloon. But inevitably, we still have it hanging around the house even a month after the event.
It was time to let it go. It usually takes some coaxing but this time, my daughter was excited to make a little note for her friend Maisie in New York. A friend she's never met other than on iChat. So Maisie, look up to the skies for a big blue balloon, this one is for you ;)
26 May 2012
WHAT HAPPENS HERE...
I'm still not a huge fan of Vegas. This trip didn't change my opinion much. There's serious effort to keep you lost within a hotel so you can't spend your money in the other hotels. As a result, nothing is convenient. There is no walking in a straight line in that town.
But I was grateful for some much needed inspiration. I'm not a gambler. I'm not one to carry around a giant souvenir cocktail, but I do like to shop and take photos of things that inspire me. Thank goodness I married someone that enjoys the same (see him shooting the Louis Vuitton wall at Crystals, City Center). I Love, LOVE, loved Prada, of course, and Stella McCartney with her beautiful chandelier horse, "Lucky Spot". All Saints at Cosmopolitan Hotel was making me drool with the vintage sewing machines lining all of its window as well as the many patterns, textures, and spectacular lights all along the strip.
I also loved the variety of casino carpets. I found myself looking at the floor more and more, enjoying the color combinations and patterns. I thought, what a great book this would make... and guess what, someone else thought the same.
But I was grateful for some much needed inspiration. I'm not a gambler. I'm not one to carry around a giant souvenir cocktail, but I do like to shop and take photos of things that inspire me. Thank goodness I married someone that enjoys the same (see him shooting the Louis Vuitton wall at Crystals, City Center). I Love, LOVE, loved Prada, of course, and Stella McCartney with her beautiful chandelier horse, "Lucky Spot". All Saints at Cosmopolitan Hotel was making me drool with the vintage sewing machines lining all of its window as well as the many patterns, textures, and spectacular lights all along the strip.
I also loved the variety of casino carpets. I found myself looking at the floor more and more, enjoying the color combinations and patterns. I thought, what a great book this would make... and guess what, someone else thought the same.
FOR ONCE IN MY LIFE. BILLBOARDS 2012.
This was a once in a lifetime opportunity. And we knew it. We knew it when we got in the gold limo behind MGM. When we stepped onto the red carpet. When we saw the many guitars all lined up and ready for their performers. When Ty's publicist took us to our 8th row seats. When Brandi sat down next to us. When Mike Tyson and Tommy Hilfiger were within spitting distance. And when Ty led us to the side of the stage to watch Stevie Wonder sing.
We were so very fortunate and loving every minute of it. I was snapping photos with my phone like a fool, not even caring that none of them even look good. It was no surprise that my husband was blending into the crowd of "who's that?" with such success. Tommy Hilfiger kept staring at us, probably wondering "who's that?"
It was fun to see the performances even though I don't really have Bieber Fever or listen to Katy Perry. I gained a new respect for performers like Taylor Swift after hearing all of her amazing accomplishments. I was so proud of Ty for doing so well as a host with Julie Bowen. I had happy-tears in my eyes for the lucky singers that got to sing with Stevie Wonder and I was in awe of the many, many people backstage making the whole thing run so smoothly.
Once in a lifetime. Thanks Ty and Holly!
See real Billboards photos here.
![]() |
| Backstage shots of Cee Lo and Stevie Wonder being interviewed. My husband Tosh beaming after Stevie said to him, "I love you too, man." After show parties at 1 Oak @ The Mirage and Lily @ Ballagio. |
Subscribe to:
Posts (Atom)